
DIY Plant Stands
I have been working on a bedroom transformation and was in need of something to fill an empty space in the corner. So naturally, I went to my favourite home decor store, HomeSense to have a look to see what I could find.
As i was browsing the isle, I found myself going back numerous times to have another look at the plant pots. The ones that caught my eye the most were the pots that came with the wooden stands. I had myself convinced that this is what my empty corner needed. So I grabbed one to have a better look.
As soon as I grabbed it i noticed how unstable and "cheap" it was made. It was made "cheap" but the price tag still said 79.99. So, thats when I told myself " you are a wood worker, you can make a better one".
So, I decided to not only build a few for myself but share my process with you as well, so you can build some too.
Materials:
1 - 2x4 or 2 - 2x2
wood glue ( I use Akfix D3)
4 lag bolts (you can use ordinary 2.5" wood screws as well)
stain ( I used provincial by rustoleum)
plant pot ( I got mine from Home sense)
painters tape (optional)
flat black spray paint (optional)
Tools I used:
Mitre saw
table saw (only needed if you are ripping down your lumber)
orbital sander
drill
clamps
Cut List: * these are cuts for a 9"x9" square pot. If you have a different size pot, to determine the cut length for the cross pieces, measure the pot and use the biggest measurement. Also, you can cut the leg height to your preference. Can be made shorter or taller.
If you chose to use 2x4's, you first need to rip them down on your table saw to make 2x2's.
cut (4) legs : 2x2"'s at 25" long
cut (2) cross pieces : 2X2"'s at 9" long

Lets start Building:

4 legs and 2 cross pieces.
set your saw to 45 degrees. Mark out centre on the bottom of each leg. Position the back of your saw blade on the centre mark and make a cut. This will give the legs a simple detail on the bottom, but still allow them to stand.

3. Mark center on your cross pieces. and mark 0.75 inches on either side of the centre mark. Between these two marks is where you will cut for your half laps.
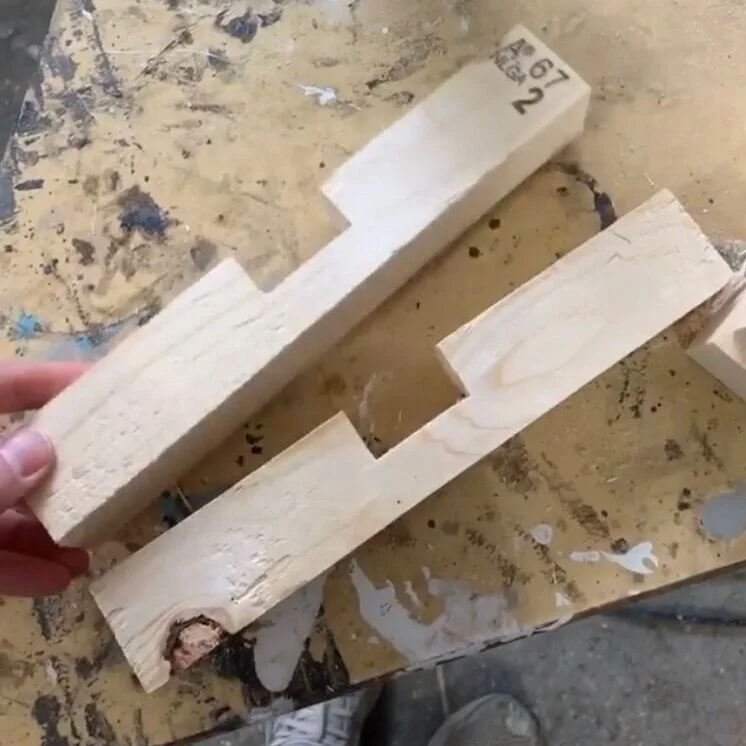
4. Set the cut depth on your mitre saw to 3/4". You will need to cut both cross pieces at this depth between the lines you drew. By cutting 3/4" of the way down on both pieces, you will be able to interlock them together to create a half lap.

5. Take the legs, and measure 6" down from the top and 7.5" down from the top. Find centre between the two measurements and pre drill a hole. Then find centre on each end of the half lap cross pieces and drill a hole as well. ( pre drilling will help to ensure that nothing cracks when you screw in your lag bolts)

VERY IMPORTANT:
Make sure when you assemble, you position your half lap pieces in OPPOSITE directions. One MUST be up and one MUST be down. If not, you will not be able to interlock them

8. Put glue on both ends of one half lap piece. line up the half lap cross pieces so it sits in between the markings on 2 legs.
9. Use clamps to hold it all together so its easier to screw in your lag bolts.

10. Now that all the pieces are assembled, interlock the joints and admire your stand. Now it is onto finishing.
Now onto my favourite part. Finishing.
When it comes to finishing, the possibilities are endless. So this is where you get to be creative. I chose to stain mine with Minwax stain, color was provincial. I also decided to give my stands a "dipped" look on the bottom of the legs. After the stain was dry, I used painters tape to tape off the leg bottoms and used flat black by rustoleum. (For some reason I only had black primer at the time, so I just decided to use this)
Once everything is dry, interlock the pieces, place your pot on the stand, step back and be proud of what you just built.
I decided to put fake greenery in mine, but this is only because I am horrible at keeping plants alive. As I mentioned before, my plant stands found a home in my bedroom, but these look great displayed in any room of your choice.
If you found this post helpful and easy to follow please be sure to give it a like and drop a comment to let me know.
Follow along with me on Instagram and be sure to tag #EIRplantstand so I can share all your amazing builds.
can't wait for our next DIY together
xo
Amber
